
The Kubernetes Control Loop & Declarative Architecture
At the heart of Kubernetes is the concept of the Control Loop. In software engineering, a control loop is a non-terminating loop that regulates the state of a system. In Kubernetes, the controller manager runs multiple loops that continuously compare the Desired State (declared in your YAML manifests) with the Actual State (active running pods, configurations, and nodes in the cluster).
Core Control Plane Interaction Flow
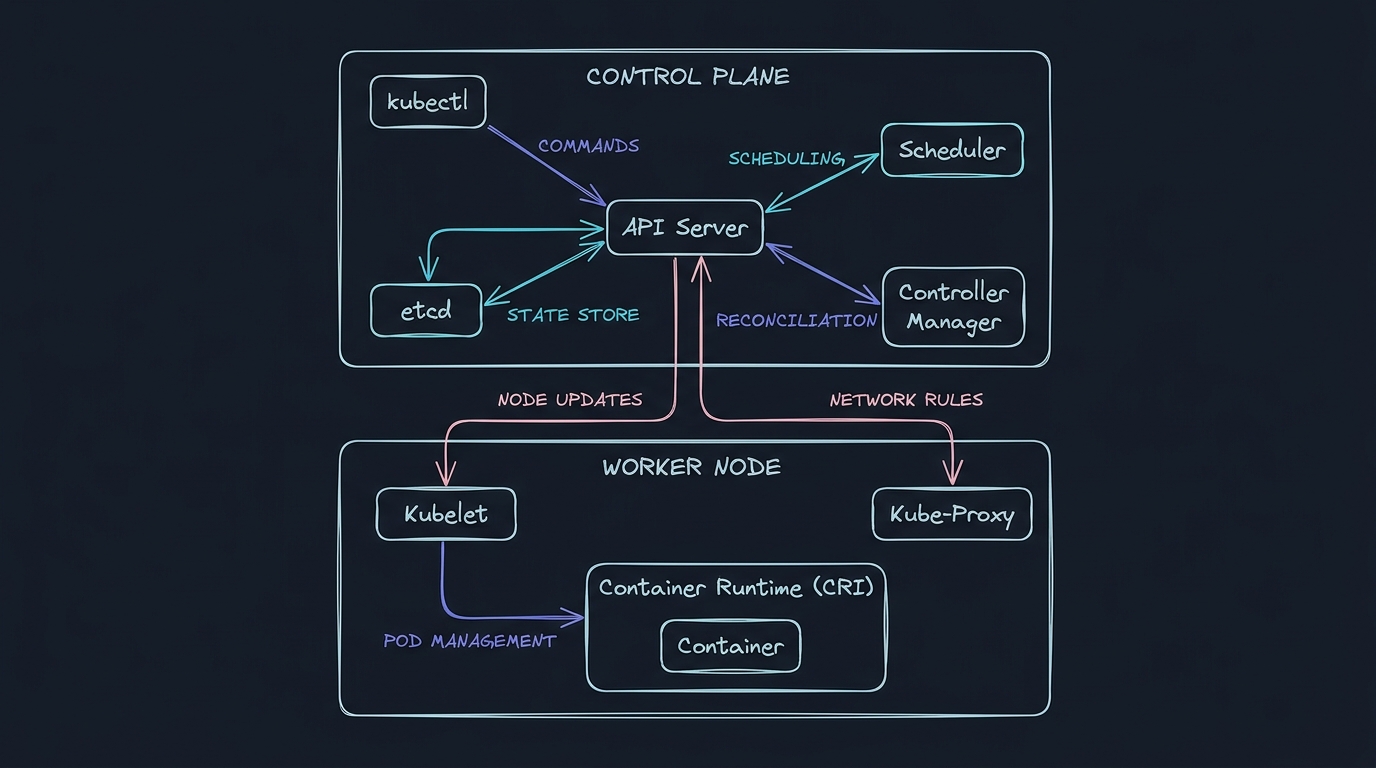
1. API Server (kube-apiserver): Exposes the HTTP/JSON API. It validates and configures data for state objects (Pods, Services, ReplicationControllers). It is the only component that communicates directly with the etcd database.
2. etcd: A distributed, consistent key-value store used as Kubernetes' backing store for all cluster data. It utilizes the Raft consensus algorithm to guarantee consistency across multi-node control planes.
3. Scheduler (kube-scheduler): Watches for newly created Pods with no assigned node, and selects a node for them to run on based on resource availability, taints, tolerations, and affinity rules.
4. Controller Manager (kube-controller-manager): Runs controller processes like the Node Controller, Job Controller, EndpointSlice Controller, and ServiceAccount Controller.
5. Kubelet: The primary agent running on each worker node. It registers the node with the API server, monitors PodSpecs submitted to the API server, and instructs the Container Runtime (CRI) to spin up containers.
---
Advanced Technical Q&As (Actual Interview Scenarios)
Q1: Walk me through the step-by-step lifecycle of a Pod from the moment you run 'kubectl apply -f deployment.yaml' to the containers running on a node.
Answer: The startup sequence involves several key steps across the cluster architecture:
1. Authentication & Validation: kubectl sends an HTTP POST request to the API Server. The API Server authenticates the user, authorizes the action via RBAC, and runs the manifest through mutating and validating admission webhooks.
2. etcd Persistence: Once validated, the API Server writes the Deployment object to etcd.
3. Deployment Controller Reconciliation: The Controller Manager detects the new Deployment. Its Deployment Controller loop creates a ReplicaSet object, which in turn writes Pod definitions to the API Server (persisted in etcd).
4. Scheduling Phase: The Scheduler detects the new Pods with their nodeName field empty. It filters nodes based on constraints (e.g. CPU/Memory requests, NodeSelectors, Taints) and scores the eligible nodes. It writes the selected node's name to the Pod's binding spec on the API Server.
5. Node Execution (Kubelet): The Kubelet on the selected worker node is watching the API Server for Pods bound to its node. It detects the assignment and calls the CNI (Container Network Interface) plugin to allocate an IP address and configure network namespaces.
6. Container Runtime Invocation: Kubelet calls the CRI (e.g., containerd) via gRPC to pull the container image and start the containers. Kubelet then monitors the container health via liveness and readiness probes.
Q2: How does Kubernetes handle Pod Eviction when a worker node runs out of memory (OOM)? Explain the role of Quality of Service (QoS) classes.
Answer: When a node experiences resource pressure (specifically memory or disk), the Kubelet starts evicting Pods to reclaim resources and prevent node failure. Eviction decisions are heavily influenced by the Pod's QoS class, which is determined by its container resource settings:
- Guaranteed: Every container in the Pod must have CPU and memory limits that exactly match their requests. These Pods have the lowest eviction priority and are only killed if the node itself runs out of memory and no lower-priority Pods remain.
- Burstable: At least one container in the Pod has a request set, but the request doesn't equal the limit, or limits are not defined for all containers. These Pods can consume extra resources (burst) but are evicted before Guaranteed Pods.
- BestEffort: Containers have no requests or limits defined. These Pods are given the lowest priority. If the node runs low on memory, BestEffort Pods are OOMKilled first.
To inspect a Pod's assigned QoS class, check the status metadata:
kubectl get pod -o jsonpath='{.status.qosClass}' Q3: What is the difference between CoreDNS service IP resolution and direct endpoint routing? How does kube-proxy orchestrate this?
Answer: In Kubernetes, Pods are ephemeral; they can be destroyed and recreated with new IP addresses. To provide a stable entry point, we use a Service.
1. CoreDNS: When a Pod queries a service (e.g., curl http://billing-service), CoreDNS intercepts the request and resolves the hostname to the Service's cluster IP (a virtual IP that does not belong to any physical network interface).
2. Kube-Proxy: Runs on every node and intercepts traffic targeted to the ClusterIP. By default, it operates in IPVS or iptables mode. In iptables mode, kube-proxy writes rules in the host's Linux netfilter table. When packets hit the virtual ClusterIP, the iptables rule translates the destination IP (using DNAT) to one of the backend Pods' actual IPs, balancing the traffic randomly.
3. Endpoints/EndpointSlices: The controller manager continuously updates the Endpoints resource with the active IPs of healthy Pods matching the selector. Kube-proxy reads these endpoints to populate its routing tables.
---
Production Troubleshooting: Diagnostics Cheat Sheet
When a pod enters CrashLoopBackOff, developers often waste time checking the wrong resources. Follow this structured diagnostics path:
| CLI Command | Objective | What to look for |
|---|---|---|
kubectl get pods -n | Check basic lifecycle state. | Confirm restart count and duration. |
kubectl describe pod | Analyze event logs & limits. | Look at exit codes (e.g., 137 = OOM, 1 = App error) and failing health probes. |
kubectl logs | Inspect container stdout/stderr. | Capture stack traces or database connection timeouts before the crash. |
kubectl get events -n | Check namespace-level event logs. | Identify scheduling blocks, node disk pressure, or mount errors. |
Code Example: Restoring OOMKilled Microservices
Below is a production manifest demonstrating how to apply resources limits to prevent OOM termination while setting up liveness/readiness probes with a startup delay buffer:
apiVersion: apps/v1
kind: Deployment
metadata:
  name: api-gateway
  namespace: production
spec:
  replicas: 2
  selector:
    matchLabels:
      app: api-gateway
  template:
    metadata:
      labels:
        app: api-gateway
    spec:
      containers:
      - name: gateway
        image: api-gateway:v1.4.2
        resources:
          requests:
            memory: "128Mi"
            cpu: "100m"
          limits:
            memory: "256Mi" # Prevents container from consuming infinite host memory
            cpu: "500m"
        startupProbe:
          httpGet:
            path: /healthz
            port: 8080
          failureThreshold: 30
          periodSeconds: 10 # Gives app 300s to complete initialization before liveness starts
        livenessProbe:
          httpGet:
            path: /healthz
            port: 8080
          periodSeconds: 15
        readinessProbe:
          httpGet:
            path: /ready
            port: 8080
          initialDelaySeconds: 5
          periodSeconds: 10
By separating the startupProbe (runs first) from the livenessProbe, you prevent slow-starting applications (like Java Spring Boot apps or apps that run database migrations on boot) from being killed prematurely by Kubelet during their initialization phase.